Rate limit Google Cloud Functions with API Gateway
A free built-in solution after hours reading fuzzy documentations
This tutorial follows the implementation made in this tutorial where we created an API with two routes for a Smoothie shop:
With Google API Gateway, deployment, maintenance and monitoring is made easy. BUT, contrary to Cloud Endpoints, we can’t rate limit our API… For real?
After hours reading tutorials, documentation, watching videos and trying different costly solutions, I found out a hack combining Cloud Endpoints and API Gateway documentations.
To rate limit the API, we must add an API Key. Quotas will concern every API Key distinctly.
Add an API Key to the Gateway
To add an API Key we must edit the previously uploaded Open API specification file and add a few keys.
This one for every route :
security:
      - api_key: []
And this one at the very end :
securityDefinitions:
  api_key:
    type: "apiKey"
    name: "key"
    in: "query"
The resulting file will look like :
(IMPORTANT NOTE) As of March 2023, API Gateway still use OpenAPI v2. If you are adding path parameters or other specific needs, check the correct version ;)
We now have to create a new API Config :
Go back to https://console.cloud.google.com/api-gateway/api
Again click “Create Gateway”
But this time, in the API part, select the API we created in the previous Tutorial.

API Config Part
- Keep “Create new API config”
2. Choose a Display Name for this config
Api Config Name : Medium Config with API Key3. Upload the YAML file we just created
API Gateway Part
Give a name to the Gateway and a region.
Name : SmoothAPI Gateway API KeyThe deployment should again take ages.
Once deployed, you can access the API URL after clicking the API and clicking the “Gateway” tab.
If you try to trigger a route defined in the OpenAPI Specification, you will get the following answer :

We need to create an API Key.
To assign the API Key, we first need to enable our API to be used by Google Cloud Platform :
Authorize the API
The fresh API has to be authorized to be accessed GCP services like Credentials.
To authorize the API, we need its Managed Service name.
To find it : Click the API and go to the “Details” tab, copy the “Managed service” value and keep it safe.
Mine looks like this :
smoothapi-0h4j1i8nhd89ej.apigateway.my-project.cloud.googNow that we have the Managed service, we can go to https://console.cloud.google.com/apis/library?pli=1 where we can find all existing APIs, including ours.
Search your API by API name :

Click it and click “Enable”.
The API is now enabled, we can attribute credentials.
Attribute credentials
Go to https://console.cloud.google.com/apis/credentials
Click “Create Credentials” and select “API Key”.
The API Key is displayed, directly click “Restrict Key”.
Keep “Application restrictions” at “None” and click “Restrict key” in the “API restrictions” section.
Search your API.

Prepare your cup of tea while the API Key is being created.
After 5 minutes, you can call the gateway using the previous route and the fresh api key at the end :
https://smoothapi-gateway-api-key-3dh32s89.nw.gateway.dev/listSmoothies?key=AIzaSyADWwrzjr32fj_apz2AX-GRKzHkDGNDer0You will access the smoothies list and be able to order a seasonal smoothie.
Add Quotas and Rate Limit the API
You want to rate limit the API in a few clicks for free with no additional information?
Well… according to Google API Gateway documentation, that’s not possible.
They kind of mention it, but there aren’t any tutorial explaining how to do.
You are the lucky person about to know how to do!

Definition
To configure Quotas we need to edit the OpenAPI Specifications file and give the following information :
- Name our quotas
- Set the default rate (query per minute and per project)
- Define the cost of each paths call
- Name our quotas
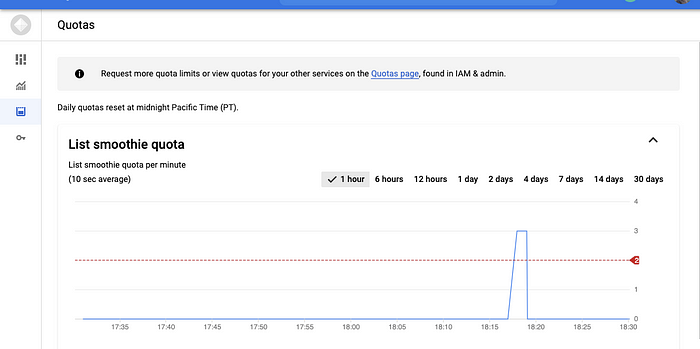
A quota need a name and a displayName. The displayName will be shown and should be readable in the IAM & Admin -> Quotas page to monitor the use of the route.
We will add the x-google-management key at the root level of the YAML file :
x-google-management:
  metrics:
    - name: "list-smoothies-request"
      displayName: "List smoothie quota"
      valueType: INT64
      metricKind: DELTA
    - name: "order-smoothie-request"
      displayName: "Order smoothie quota"
      valueType: INT64
      metricKind: DELTA
For now, valueType and metricKind have no other options.
2. Limit our quotas
Once we have metrics, we need to set a maximum for it.
Inside the x-google-management , add this key :
quota:
    limits:
      - name: "list-smoothie-limit"
        metric: "list-smoothies-request"
        unit: "1/min/{project}"
        values:
          STANDARD: 2
      - name: "order-smoothie-limit"
        metric: "order-smoothie-request"
        unit: "1/min/{project}"
        values:
          STANDARD: 2
What’s after “metric: ” should be the name of the corresponding metric set in the previous part.
In the previous example, I set the limit at 2 calls per minute. You might prefer using hours instead of minute? That’s not possible for now, only minute is allowed.
3. Set the cost of an API call
Inside each route (at the same level as the security key), we have to set a cost :
x-google-quota:
        metricCosts:
          "list-smoothies-request": 1
The final yaml file will look as follow:
Deployment
Heeeeere we go again :
Go back to https://console.cloud.google.com/api-gateway/api
Again click “Create Gateway”
Select the same API.

API Config Part
- Keep “Create new API config”
2. Choose a Display Name for this config
Api Config Name : Medium Config with API Key and Quotas3. Upload the YAML file we just created
API Gateway Part
Give a name to the Gateway and a region.
Name : SmoothAPI Gateway API Key and QuotasThe deployment should again take ages.
TEST
We now have a new Gateway URL (accessible in the Gateway tab)
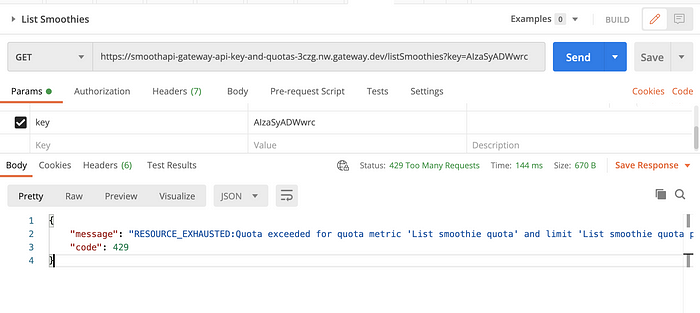
We can call the listSmoothies endpoint a multiple time, we will get this answer confirming that everything went well :

{"message": "RESOURCE_EXHAUSTED:Quota exceeded for quota metric 'List smoothie quota' and limit 'List smoothie quota per minute' of service 'smoothapi-011vx544djuq3.apigateway.steam-outlet-209412.cloud.goog' for consumer 'project_number:XX'.","code": 429}
Quotas are displayed in a dashboard in IAM & Admin -> Quotas :

That’s all!
If you enjoyed reading how to do what’s not possible, 50 claps minimum ;)
Adios hippos!
